Welcome to this Docker Tutorial for DevOps, a curated collection of my personal notes and insights gathered through daily hands-on experience. I created this guide not only as a learning tool, but also as a quick reference I frequently use in my own work.
My goal is to present Docker in a clear, fundamental way — whether you’re new to containerization or just looking to reinforce your understanding. If there are specific topics you’d like me to expand on or add, feel free to share your suggestions in the comments.
Having said that, let’s start with a quick look at the history and evolution of Docker.
Docker History Lesson
I believe before starting to learn about docker using this docker tutorial, it will be beneficial to know what happened before docker came into existence, what problems people faced which lead to innovation of making docker technology, so much so that it is the most popular technology now.
BIG SERVERS: In the very early days, whenever there was a need to build and deploy a business application, all that IT department did was to buy big servers. Then built Windows and Linux Operating systems did not have framework/architecture to safely and securely run multiple applications on the same server. Thus, overly expensive big machines were ordered just for running one application, which were even more underutilized. As a result, a lot of money and resources was wasted.
VIRTUAL MACHINES: Allowed us to run multiple applications on the same server. A game changer. New apps were now run on the same existing underutilized machines. BUT.. here comes the issues with VM..
- Each VM needed its own Operating System. Thus, needing its own CPU, RAM, Patching and license
- Slow to boot
- Portability was not easy, as they were large in sizes.
CONTAINERS ARE BORN: Unlike VMs, these do not require their own OS. Thus, saving a lot of resources like CPU, RAM as well as head ache of OS patching and licensing costs. All containers on a single host share the same OS.
Portability was addressed as well. Fast to start and moving from one platform to another was now super easy.
Docker and Windows, Linux and Mac OS
A very important relation between container and underlying OS to remember before going forward is that containers shares the kernel/OS of the host it’s running on
Windows OS:
- Support both the windows container as well as Linux containers.
- Windows container runs windows app that require a host system with windows kernel.
- Any windows host running the WSL 2 can also run Linux containers. Thus, you can run Linux containers on windows with the WSL 2 backend installed.
Linux OS: Linux containers are more popular and widely used, as they are smaller and faster and majority of tooling exists for Linux.
Mac OS: There are no Mac containers in the market, however you can run your Linux containers on Mac using Docker desktop.
Why use docker
Makes it really easy and straight forward for you to install and run software on any given computer, be it desktop or any cloud based computing platform
To understand the ‘WHY’ part a bit more, let us look at a very basic use case of installing Redis on your computer.
To install redis on your computer:
Step 1: wget http://download.redis.io.. From the step 1 command itself, you can get the error “Wget command not found”
So, you troubleshoot and then you get into some other issue, upon executing the next step.
Now, compare it with installing redis using docker..all you need to do is run the command
Docker run -it redis
That’s all you need to do..easy peasy
Thus, making it really easy to install and run software without worrying about setup or dependencies
What is docker
Put very simply, docker is a platform or ecosystem, around creating and running containers.

There are three major components that make up docker:
- docker runtime
- docker engine/daemon
- docker client
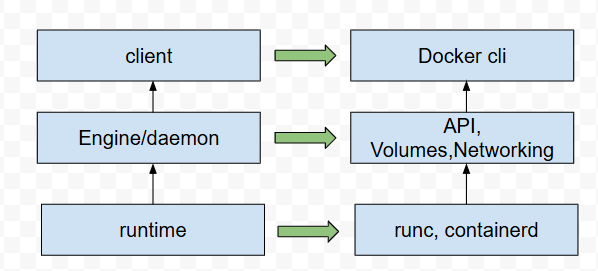
Docker Runtime:
Operates at the lowest level and is responsible for starting and stopping containers. It includes building all the OS constructs such as namespaces and cgroups.
Low-level runtime: is called runc and is the implementation of OCI – Open Container Initiative runtime spec. It interfaces with the underlying OS and start and stop containers. Every container on the docker node was created and started using an instance of runc.
Higher level runtime is called containerd. This manages the entire container lifecycle including pulling images and managing runc instances.
Docker has a long running containerd process instructing runc to start and stop containers.
runc is never a long running process, and exits as soon as a container is started
Docker Daemon/Engine:
Sits above containerd and performs higher-level tasks such as exposing the Docker API, managing images, volumes, networks, etc.
Implements the runtime, API and everything else required to run containers
In Linux, the client talks to the daemon via a local IPC/Unix socket at /var/run/docker.sock.
On windows, it happens via a named pipe at npipe:////./pipe/docker_engine
Orchestrator:
Docker also supports managing clusters of nodes running docker. These clusters are called swarms and the native technology is called docker swarm.
A word about Docker Desktop
Desktop app from Docker, with the intent of making it super easy to work with containers. It Includes Docker Engine, Slick UI and an extension system with marketplace.
Gives you a fully working Docker environment that’s great for development, testing and learning
Includes Docker compose and can even let you enable single node K8S cluster for you to learn and use.
Can run Native windows container and Linux container on windows OS and Linux containers on mac OS and Linux OS.
Docker desktop on Mac installs all of the Docker Engine components in a lightweight Linux VM that seamlessly exposes the API to your local mac environment.
Which is why you can open a terminal in mac and write docker commands without knowing its all running in a vm underneath.
Docker Engine – Deep Dive
This section tries to explain the inner working of Docker Engine.
Think of Docker Engine as core software that runs and manages containers. Just like a car engine, docker engine is also made up of small parts specialized to do their jobs. Such as Docker daemon, build system, containerd, runc and various plugins such as networking and volumes. Together these create and run container
A Brief history: Docker engine has two major components when first released:
1. Docker daemon
2. LXC
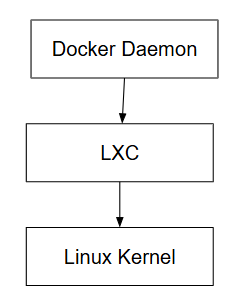
Daemon was a monolithic library – it contained all the code for API, runtime, image builds and more.
LXC provided daemon with access to the fundamentals building blocks of containers that existed in Linux kernel -. Like namespaces and control groups (cgroups)
Issues with first release:
- LXC was Linux-specific, thus restricting multi platform.
- Monolithic daemon was also an issue. It was hard to innovate, slower.
Improvements made:
- Docker daemon was broken down into small specialized tools.
- Container execution and container runtime code entirely removed from the daemon and refactored into small, specialized tool. Thus, containerd and runc were born.
Libcontainer was developed as a replacement for LXC. It was replaced in Docker 0.9
Docker now uses runc as container runtime code. It is the reference implementation of the OCI container runtime spec. runc is solely responsible for creating containers.
Containerd component of Docker Engine makes sure Docker images are presented to the runc as valid OCI bundles.
Containerd
All of the container execution logic is in containerd. Its sole purpose is to manage container lifecycle operations, such as start, stop, pause..
Sits between the daemon and runc. Although it started out as small, lightweight and designed for single task in life. However, over time it does things like image pulls, volumes and networks.
Anatomy of docker run command – starting new container, from docker daemon and runtime perspective
docker run -name ctrl -it alpine:latest sh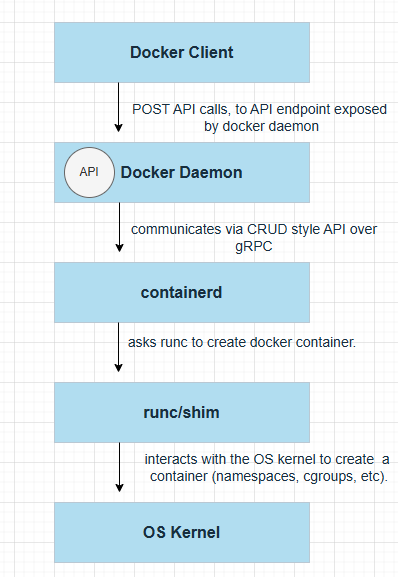
- Docker client converts the command into the appropriate API payload and POST them into API endpoint exposed by the docker daemon
- API is implemented in the daemon and can be exposed over local socket or the network. In Linux it is /var/run/docker.sock and in Windows OS it is \pipe\docker_engine
- Daemon then makes a call to containerd. It communicates via a CRUD style API over gRPC
- containerd creates a container by using runc. It converts the required docker image into an OCI bundle and tells runc to use this to create a container.
- Runc then interacts with the OS kernel to pull together all of the constructs necessary to create a container (namespaces, cgroups, etc). Container process starts as a child process of runc..and as soon as container is created, runs will exit.
- shim becomes container’s parent process after runc exits
What is SHIM again please?
Shim is Integral to the implementation of daemonless containers. Once runc exits, containerd’s shim process becomes the container’s parent.
Responsibilities of shim:
- Keeping any stdin and stdout streams open so that when daemon is restarted, the container doesn’t terminates due to pipes being closed etc
- Reports the container’s exit status back to the daemon
Docker Images
Think of Docker images as read-only package that contains everything you need to run an application. It includes app code, app dependencies, minimal set of OS constructs and metadata. A single image can be used to start one or more containers. If you are from the Java/C++ world, you can think of them as classes. Just like you create objects from class, you create containers from images. Image is a single file with all the deps and config required to run a program
Docker images are stored in a registry like Docker Hub.
Pull operation downloads an image to your local docker host where docker can use it to start one or more containers.
Images are made up of multiple layers that are stacked on top of each other and represented as a single object. Images are build time constructs and containers are run time constructs.
You can not delete the image until the last container using it has been stopped and destroyed.
Images/containers are supposed to run a single application or service. It only needs the code and dependencies of the app it is running.
Images don’t include a Kernel, it shares the kernel of the host they are running on.
Local image repository on a Linux host is usually /var/lib/docker/<storage-driver>.. If using Docker Desktop on Mac or PC, everything runs inside of a VM.
Image Repositories
Images are stored in a centralized place called registries. When pulling the image from these repositories, you need to specify the name of the image. Image registries contain one or more image repositories, which in turn contain one or more images.
Official repositories are the home to images that have been vetted and curated by the application vendor and Docker, Inc. secure, well documented and in line with best practices. Check out the image below and look at the “Docker Official Image” text highlighted. This is an example of redis official image in docker hub.
Link: https://hub.docker.com/_/redis

To pull images from Docker hub unofficial repository, just prepend the repository name with the docker hub user name or organization name.
e.g. docker pull <docker hub username>/<image name>:latest/version => As shown in the image below, to pull grafana image just prepend the organization name, “grafana”. docker pull grafana/grafana . Link: https://hub.docker.com/r/grafana/grafana
To pull images from 3rd party repositories, just prepend the repository name with the DNS name of the registry.
E.g. docker pull gcr.io/google-container/git-sync:v3.1.5
Note: Latest is an arbitrary tag and is not guaranteed to point to the newest image in a repository. A single image can have as many tags as you want.
Dangling Images
A dangling image is one that is no longer tagged and appears in listings as <none>:<none> . It commonly occurs when building a new image with a tag that already exists.
command to filter dangling images:
docker images –filter dangling=true
Delete all dangling image on system command: docker prune -a
Layers of Docker Image
All Docker images start with a base layer and as changes are made and new content is added, new layers are added on top. Image is a loose collection of independent layers. It is just a manifest file that lists the layers and some metadata. The app dependencies lives in layers with no concept of being part of something bigger. Commands such as “docker inspect” and “docker history” is a great way to see the details of the image. It shows the build history of an image and is not a strict list of layers in the final image.
Docker employs a storage driver that is responsible for stacking layers and presenting them as a single unified filesystem/image.
E.g. overlay2, devicemapper, btrfs and zfs – based on linux filesystem or block-device technology.
Multiple images can and do share layers. This leads to efficiency in space and performance. When doing docker pull, if the later already exists locally, it will say already exists.
IMPORTANT: If an image layer is shared by another image or if it’s in use by a running container, it won’t be deleted until all images that reference it have been deleted.
Docker Image Digest
Docker supports Content Addressable storage model. As part of this model, all images get a cryptographic content hash, which we also call as digest.
Digest is the hash of the content of the image, thus, new image will always be created with the unique image digest. Digests are immutable and provide a solution to the problem of using tags where when you fix an image and tag it the with the same name as that of the incorrect image or image having issues.
How Does Image digest helps us?
Using the digest of the image, you can be sure that you are pulling the same image as opposed to using tag which might be overwritten when creating new image.
docker pull alpine
Docker images –digests alpine
Docker pull alpinesha256:0112…4re3
As seen in the section above, image is nothing but a manifest file that lists the layers and some metadata. Thus, each image is identified by the crypto ID, that is hash of the manifest file. Each layer is identified by a crypto ID that is a hash of layer’s content. Thus, changing anything will change the associated crypto hashes.
Now, the layers are compressed when saved in registry. Which means their hash will be different. After every image layer push, docker hub verifies if the content was not tampered with. To do this, it runs a hash against the layer content and checks it against the hash that was sent. As the layer was compressed, the hash verification will fail. Thus, each layer also sometimes gets a distribution hash. It is a hash of the compressed version of the layer and is included with every layer pushed and pulled to the registry.
How can my image run on multiple platforms
A single image can run on multiple platforms and architecture. To make this happen, the registry API supports two important constructs:
1. Manifests list
2. Manifests
Manifest list: a list of architectures supported by a particular image tag. Each supported architecture has its own manifest that lists the layers used to build it.
Docker manifest command lets you inspect the manifest list of any image on docker hub,
Docker manifest inspect golang | grep ‘architecture\|os’
Namespaces and cgroups – fundamentals for containers
As you know, OS kernel sits between running application and the system hardware. Running application always interact with kernel using system call.
For example, a python app might say i want to write a file to hard drive to kernel. After which kernel interacts with the hardware and file gets written.
Now, consider a situation where, App A might need python v2 and App B needs Python v3. Unfortunately, your system can have only one python installed, unless you change the path and the one takes precedence over another or some other workaround, but it is a hassle. Let’s assume you can’t have two python versions installed at the same time.
To overcome such situations, you can use namespacing.. i.e. a segment of hard disk, dedicated to housing python. This way you can have one namespace for Python V2 and one for V3. Kernel figures out to which process or namespace it should send the call to. hence, if a call is made to use Python V2, for example, Kernel will know which namespace it should call.
Namespaces (NS): Isolates resource per process or group of processes. It can not only be used for HW but for SW as well. NS can be used for processes, Users, Hard Drive, Hostnames, Network
Control Groups or cgroups: Limit amount of resources used per process. E.g. Memory, CPU, HD I/O, Network bandwidth.
NS and Cgroup are specific to Linux OS. For windows or MacOS, we use Linux VM.
To verify, run docker version command and look at OS in server, it will be Linux
The same concept of NS and cgroups are aapplied towards containers. Every container has its own separate namespace in OS along with their own set of hardware resources, carved out using cgroups.
When image becomes container
An image is majorly made up of two components:
1. Filesystem (FS) snapshot: copy paste of very specific set of directories or files
2. Start up command
When an image becomes a container, kernel takes a portion of Hard Drive and dedicate it to the container. After which it takes what is in FS Snapshot and place it in the HDD. Once a container gets its own dedicated space and set of resources, startup command specified in the image is executed. This creates a process which is isolated to its set of container
example: docker run <image name>
- Places the fs snapshot in hard drive
- Run the startup command
Docker containers
Simply put, Container is the runtime instance of an image. Docker implements the image and the container specs as published by the OCI. Containers are fast and more lightweight – instead of running a full blown OS like a VM, containers share the OS/kernel with the host they’re running on. It is also common for containers to be minimalistic and have software as well as it’s dependencies required by the application.
We use an image to create a container. Container is an instance of an image in memory. Fundamentally, for us, it is an application. For OS, it is a program with its own isolated set of hardware resources. Own set of Memory, Hard drive, network, etc. Containers only run until the app they are executing exits.
VM vs Containers
In the VM world, hypervisor claims all physical resources on the system such as CPU, RAM, storage and NICs. It then carves these hardware resources into virtual versions that look exactly like the real thing. It then packages them into VM, We take those VM and install OS and applications on them.
In container world: OS claims all the hardware resources. On top of OS, we install container engine such as Docker. Container engine then takes OS resources such as process tree, filesystem and the network stack and carves them into isolated constructs called containers. Each container looks like real OS. Inside each container we run an application.
Hypervisors perform hardware virtualization – they carve up physical hardware resources into virtual versions called VMs. On the other hand, containers perform OS virtualization- they carve OS resources into virtual versions called containers.
VM Model carves lower level hardware resources into VMs. Each VM is a software constructs containing virtual CPUs, virtual RAM, virtual disks, etc. Every VM needs its own OS to claim, initialize and manage all of those virtual resources.
Container stop and restart
Killing the main process in the container will kill the container. Containers are designed to be immutable objects and is not a good practice to write data into them. For this reason, docker provides volumes that exist separately from the container, but can be mounted into the container at runtime. We will read about volumes in a separate section
Following are the ways to stop a container:
- Docker stop <container id>
- Docker kill <container id>
- docker rm <container id>
When using docker stop – a hardware signal is sent to primary process “sigterm” signal, indicating to container to shutdown on it’s own time. Do a cleanup or emit message when you recieve this signal
On the other hand, docker kill and docker rm sends a “sigkill” system, indicating container to shutdown now. If for any reason, container does not stop in 10 seconds, then docker will switch to docker kill
“-f” flag: “docker container rm <container> -f” = using -f flag with docker rm implies container is killed without warning, i.e. forcefully.
You can set the start of docker container with restart policy, as explained below:
| Restart Policy | |
|---|---|
| Always | If this container stops for any reason, always attempt to restart |
| Unless-stopped | Always restart unless we forcibly stop it. Will not be restarted when the daemon restarts if they were in stopped (Exited) state. |
| On-failed | Will restart container if it exits with a non-zero exit code |
docker exec – Execute commands in running container
Whenever we want to execute a command in a running container, we always use “exec” – execute additional command in the container
Format of command: docker exec <container id> <command>
To understand the relevance of “exec” command, let’s understand the fundamentals of process communication in Linux. Which are STDIN, STDOUT and STDERR. Make sure you remember that every container is also a process in Linux.
STDIN – used to communicate the info to the process. Whatever you type in terminal gets redirected to STDIN of your running process
STDOUT – conveys info coming out of process.
STDERR – error info channel. Redirected to show up on the screen
Now, let us look at an example of getting a command prompt or shell access to running container:
docker exec -it <container id> <command>“-it” – provides input to the container
-it = -i & -t -> “-i” – we want to attach our terminal to the stdin of the process
“-t” make sure all the text you enter or is coming out is nicely formatted or pretty or readable
As soon as you run this command, you should see a prompt with “#” sign. You can now run unix commands here.
Command processors -> bash, powershell, zsh, sh
Anatomy of “docker run hello-world”
1: User types in the command “docker run hello-world” on docker cli
2: Communicates it to docker server
3: Docker server checks the image cache locally
4: If image not found in local cache, it contacts docker hub. Download the hello world image file and stores it in local image cache
5: Uses that image to create instance of it, loads it in memory
Run the “docker run hello-world” second time and you should not see “unable to find image locally” in cli, as it gets it from image cache locally.
Click here for links to other Docker Resources